
CTT Guide: Why Won’t My Vinyl Stick to Transfer Tape?
Affiliate Disclosure: This post may contain affiliate links. If you purchase through my links, I may earn a small commission at no extra cost to you.
If your vinyl will not stick to transfer tape, please know you are not alone. This is one of those Cricut problems that makes people question their machine, their vinyl, their transfer tape, and possibly every life choice that led to this moment.
The good news? It is usually fixable.
When vinyl will not lift onto transfer tape, the problem is usually caused by one of a few things: the transfer tape is too weak or too strong, the vinyl is not fully cut or weeded, the backing paper is holding on too tightly, the vinyl needs more burnishing, or the material itself is giving you attitude.
Let’s walk through the most common reasons vinyl will not stick to transfer tape and what to try first.
Quick Answer: Why Is My Vinyl Not Sticking to Transfer Tape?
Vinyl usually will not stick to transfer tape because it has not been burnished enough, the wrong type of transfer tape is being used, the backing paper is holding the vinyl too tightly, or the vinyl was not cut cleanly enough.
Before throwing the whole project across the room, try this:
Burnish the front of the design really well.
Flip it over and burnish from the back.
Peel the backing paper away from the vinyl instead of pulling the transfer tape up.
Peel slowly at a sharp angle.
Try a different transfer tape if needed.
That little flip-and-peel trick solves a lot of problems.
First, What Is Transfer Tape Supposed to Do?
Transfer tape is used to move adhesive vinyl from its paper backing onto your project surface.
After your Cricut cuts the design and you weed away the extra vinyl, transfer tape helps pick up the remaining design so you can place it neatly on a cup, sign, ornament, decal, label, or whatever crafty little masterpiece you are making.
In a perfect world, it works like this:
Cut the vinyl.
Weed the design.
Place transfer tape over the vinyl.
Burnish it.
Lift the design with the tape.
Place it on your project.
Burnish again.
Peel away the transfer tape.
In the real world? Sometimes the vinyl clings to the backing paper like a toddler clings to your leg when you need to leave the house.
So let’s troubleshoot.
Reason 1: You Are Not Burnishing Enough

This is the most common issue.
Burnishing means rubbing over the transfer tape with pressure so the tape grabs the vinyl. You can use a scraper tool, brayer, old gift card, or even the edge of a ruler in a pinch.
Do not just lightly smooth it with your hand and hope for the best. Vinyl often needs firm, even pressure.
What to do:
After placing transfer tape over your weeded vinyl:
Rub firmly across the whole design.
Pay extra attention to small letters and thin details.
Flip the design over and rub the back too.
Use the edge of your scraper to press over stubborn areas.
The back matters. A lot of people only burnish the front, but burnishing from the back helps loosen the vinyl from the carrier sheet.
Reason 2: You Are Pulling the Transfer Tape the Wrong Way
If you pull the transfer tape straight up, the vinyl may stay stuck to the backing paper.
Instead, flip the whole design over so the backing paper is facing up. Then peel the backing paper away from the vinyl and transfer tape.
Yes, that sounds like the same thing.
No, it is not the same thing.
When you peel the backing away instead of pulling the tape up, you are helping the vinyl release more gently.
Try this method:
Lay your design face down.
Start peeling the backing paper away.
Keep the backing paper low and close to the table.
Peel slowly at a sharp angle.
If a piece of vinyl stays behind, lay the backing back down and burnish again.
This is one of the best fixes for small letters, thin lines, and delicate designs.
Reason 3: Your Transfer Tape Is Too Weak
Not all transfer tape has the same stickiness.
Some transfer tape is too low-tack to pick up certain vinyls, especially if the design has tiny details or the backing paper is extra grippy.
Low-tack transfer tape can work beautifully for delicate materials, but it may struggle with standard adhesive vinyl if the design needs more grip.
Signs your transfer tape may be too weak:
The vinyl does not lift even after burnishing.
Small letters stay on the backing paper.
Only larger pieces transfer.
You have to fight every little detail.
What to try:
Try a medium-tack transfer tape or clear contact paper. Some crafters also use masking tape or painter’s tape for smaller designs, especially if that is what they have on hand.
Use what works. We are not fancy here. We are effective.
Reason 4: Your Transfer Tape Is Too Strong
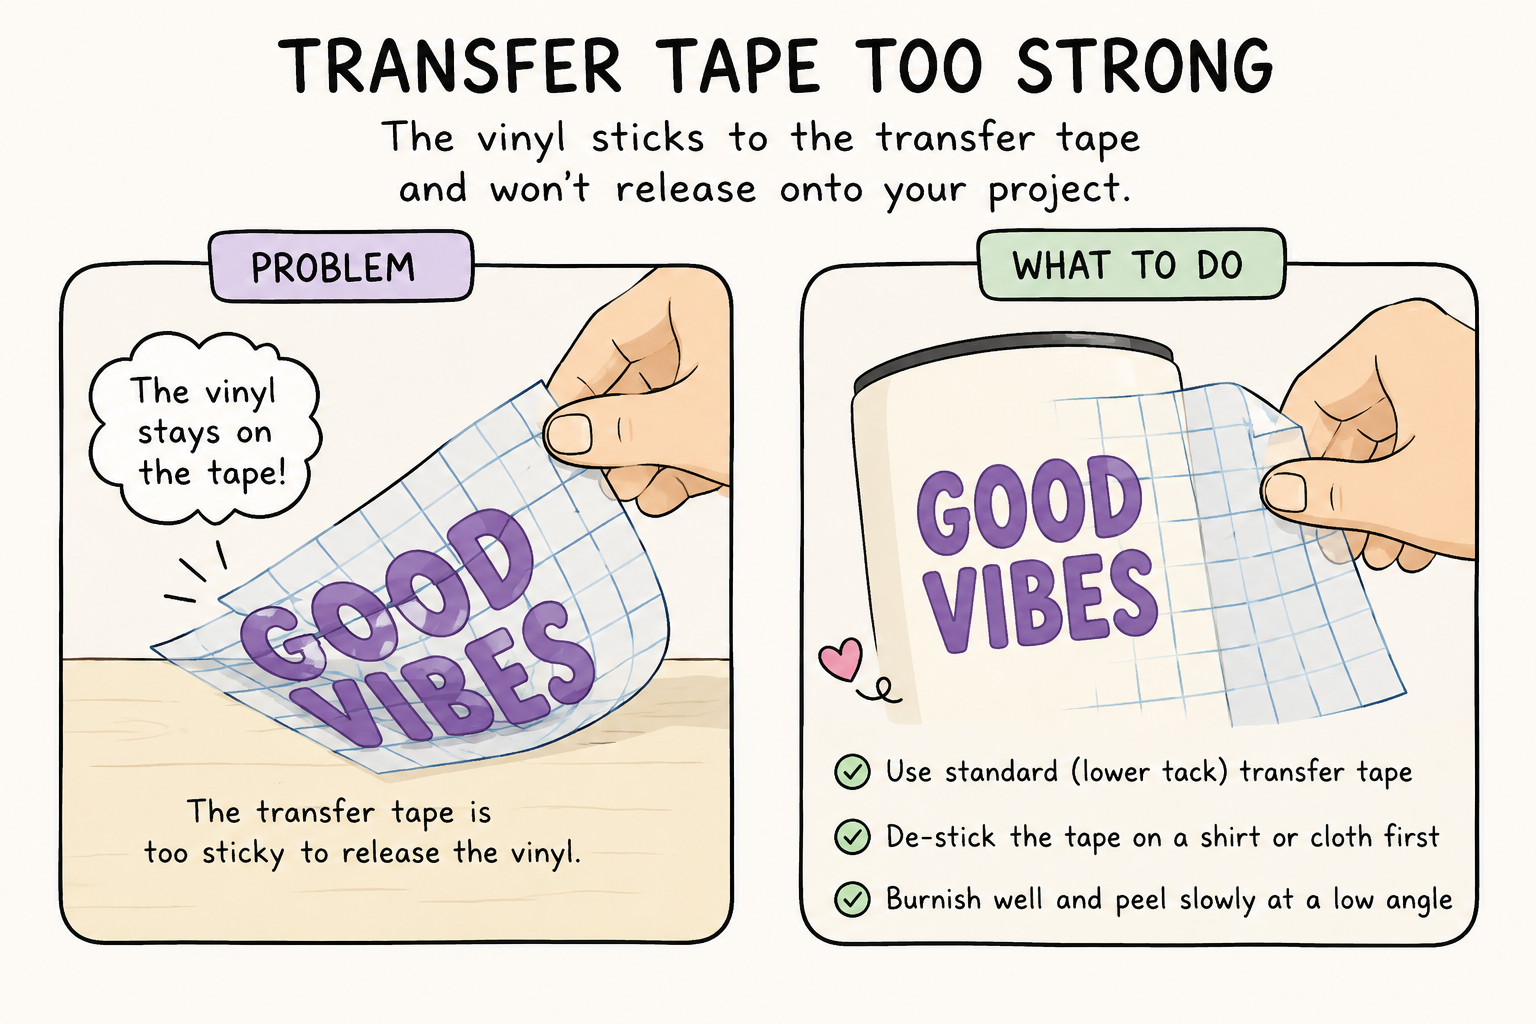
This sounds backwards, but transfer tape can also be too sticky.
Strong grip transfer tape is usually meant for textured or glitter vinyl. If you use it with regular adhesive vinyl, it may pick up the vinyl just fine but then refuse to release it onto your project surface.
So if your problem is:
“My vinyl sticks to the transfer tape, but then it will not come off the transfer tape.”
That usually means the tape is too strong, your surface is not ready, or you need to burnish more after placing the design.
What to do:
Use standard transfer tape for regular adhesive vinyl.
Save strong grip transfer tape for glitter vinyl or textured vinyl.
De-stick overly sticky transfer tape by pressing it on a clean shirt or lint-free cloth once or twice before using it.
Burnish the vinyl onto the project surface before peeling the tape away.
You want the transfer tape sticky enough to lift the vinyl, but not so sticky that it takes your design hostage.
Reason 5: The Vinyl Was Not Cut Cleanly
Sometimes the issue is not the transfer tape at all. Sometimes the vinyl is not fully cut.
If your Cricut did not cut through the vinyl layer cleanly, the design may still be attached to the surrounding vinyl or backing. That makes it harder for the transfer tape to lift the design.
Signs your vinyl may not be cut well:
Weeding feels difficult.
Tiny pieces pull up or tear.
The cut lines are hard to see.
The design stretches when you try to lift it.
Vinyl stays connected in places that should be cut.
What to try next time:
Check your blade for tiny vinyl bits.
Make sure your mat is sticky enough to hold the vinyl flat.
Use the correct material setting.
Increase pressure slightly if needed.
Do a small test cut before cutting a full design.
A dull or dirty blade can absolutely cause vinyl drama. Before changing everything, check the blade. Sometimes there is a tiny piece of vinyl stuck to it like a little craft gremlin.
Reason 6: Your Design Has Tiny Letters or Thin Details
Tiny text is cute until it betrays you.
Small letters, skinny fonts, thin lines, and intricate details can be harder to transfer because there is less surface area for the transfer tape to grab.
Tips for tiny designs:
Burnish very well.
Peel slowly.
Use a sharper angle.
Flip and peel the backing away.
Avoid overly thin fonts for small cuts.
Make the design slightly larger if possible.
Use a weeding box around small sections.
For very tiny lettering, you may need to help individual pieces lift with your weeding tool as you peel.
This is normal. Annoying, but normal.
Reason 7: The Vinyl Backing Paper Is Extra Stubborn
Some vinyl brands have backing paper that holds the vinyl more tightly than others. This can make it seem like your transfer tape is not working, even when the tape is fine.
If the vinyl is sticking to the backing more than the tape, the backing paper may be the problem.
What helps:
Flip the design over.
Bend the backing paper slightly as you peel.
Peel the backing away from the design instead of lifting the design up.
Go slowly.
Burnish again if pieces stay behind.
You can also try gently rolling the backing paper away from the vinyl rather than peeling it flat.
Reason 8: Your Vinyl or Transfer Tape Is Old, Dusty, or Dirty
Vinyl and transfer tape can lose quality over time, especially if they have been stored somewhere hot, humid, dusty, or sunny.
Dust, lint, oils from your hands, and humidity can all mess with how materials stick.
Check for:
Dust on the vinyl
Fingerprints on the adhesive side
Old transfer tape that has lost tack
Vinyl that has been exposed to heat
Materials stored loosely without protection
Store vinyl and transfer tape in a clean, dry area when possible. Keep the backing on until you are ready to use it.
Reason 9: You Are Using the Wrong Tape for the Vinyl Type
Different vinyls behave differently.
Here is the simple version:
Regular adhesive vinyl
Use standard transfer tape or medium-tack tape.
Glitter vinyl
Use strong grip transfer tape.
Textured vinyl
Use strong grip transfer tape.
Holographic or specialty vinyl
Test first. Some specialty finishes can be picky.
Removable vinyl
Use standard or lighter transfer tape.
If you use strong grip tape on regular vinyl, it may be too sticky. If you use light tape on glitter vinyl, it may not lift at all.
This is why having more than one transfer option can save your sanity.
Reason 10: Your Project Surface Is Fighting You
If your vinyl lifts onto the transfer tape but will not stick to the final surface, the issue may be the project surface.
Vinyl needs a clean, dry, smooth surface to stick well.
Before applying vinyl:
Clean the surface.
Let it dry completely.
Avoid lotion, oils, dust, and residue.
For glass, acrylic, metal, and plastic, rubbing alcohol can help remove oils.
Avoid applying vinyl to cold, wet, dusty, or textured surfaces.
After placing your design, burnish it onto the project surface before removing the transfer tape.
Peel the transfer tape back slowly at an angle. If the vinyl lifts with the tape, lay it back down and burnish again.
What to Try First When Vinyl Will Not Stick to Transfer Tape
Here is your quick rescue checklist:
Step 1: Burnish the front
Rub firmly over the whole design.
Step 2: Burnish the back
Flip it over and rub the backing side too.
Step 3: Peel the backing away
Do not yank the transfer tape up. Peel the backing paper away from the vinyl.
Step 4: Go slowly
Use a sharp angle and move slowly.
Step 5: Help stubborn pieces
Use a weeding tool to gently encourage tiny letters or details.
Step 6: Try different tape
If nothing lifts, your transfer tape may be too weak. If it lifts but will not release, your tape may be too strong.
Step 7: Check your cut
If weeding was rough, the vinyl may not have cut cleanly.
Common Mistakes That Make This Worse
Pulling too fast
Slow down. I know. Rude. But it helps.
Pulling straight up
Peel low and slow at an angle.
Skipping the back burnish
Burnish both sides. The back side is where the magic often happens.
Using strong grip tape for everything
Strong grip is not a universal solution. Sometimes it creates a new problem.
Using super tiny fonts
If the letters are tiny and skinny, the transfer tape may struggle.
Not cleaning the final surface
If the vinyl transfers but then lifts from the project, clean the surface and try again.
My Favorite Transfer Tape Trick
Flip the design over and peel the backing paper away from the vinyl.
That one small change fixes so many transfer tape problems. Instead of trying to force the vinyl to lift, you are helping the backing paper let go.
If you remember nothing else from this post, remember:
Do not pull the vinyl up. Peel the backing away.
Can I Use Contact Paper Instead of Transfer Tape?
Yes, many crafters use clear contact paper as transfer tape.
Clear contact paper can work well for regular adhesive vinyl, and it is often easier to find or more budget-friendly. Just remember that different brands have different tack levels, so test it before using it on a big or detailed project.
If your contact paper is too sticky, press it lightly onto a clean shirt first to reduce the tack.
If it is not sticky enough, you may need standard transfer tape instead.
Can I Use Masking Tape or Painter’s Tape?
Yes, for smaller designs, masking tape or painter’s tape can work.
This is especially helpful if you are transferring a small decal, label, or simple shape. The downside is that you cannot see through it as easily, so it may be harder to line up larger designs.
For small projects, though? Use what works.
FAQ: Vinyl and Transfer Tape Problems
Why won’t my vinyl lift onto transfer tape?
Your vinyl may not lift because it needs more burnishing, the transfer tape is too weak, the backing paper is holding too tightly, or the vinyl did not cut cleanly.
Should I peel the transfer tape up or peel the backing away?
Peel the backing paper away from the vinyl and transfer tape. This usually works better than pulling the transfer tape straight up.
Why does my vinyl stick to the transfer tape but not my cup or sign?
Your surface may need cleaning, or the transfer tape may be too strong. Clean the surface, burnish the vinyl onto the project, and peel the transfer tape away slowly at an angle.
Do I need strong grip transfer tape?
Only for certain materials like glitter vinyl or textured vinyl. For regular adhesive vinyl, standard transfer tape usually works better.
Why are my small letters not transferring?
Small letters have less surface area for the tape to grab. Burnish well, peel slowly, use a sharp angle, and help stubborn pieces with a weeding tool.
Can I reuse transfer tape?
Yes, many types of transfer tape can be reused a few times, especially if they still have enough tack. Reusing transfer tape can also make it less sticky, which is helpful when the tape is too strong.
Final Thoughts
If your vinyl will not stick to transfer tape, do not assume you ruined the project. Most of the time, you just need more pressure, a slower peel, a better angle, or the right type of transfer tape for your vinyl.
Start with the simple fixes first:
Burnish the front.
Burnish the back.
Flip it over.
Peel the backing away.
Go slow.
And if it still fights you? That is not a personal failure. That is just vinyl being vinyl.
For more Cricut help, check out the CTT Hub or join the Cricut Tips & Tricks community for more beginner-friendly troubleshooting, project ideas, and real-life crafting help.